
If you’ve been considering swapping your paving for outdoor slab tiles (and if not, why not?), then you might be thinking about the best way to install them. Whilst the traditional method of adhesive and grout will make for a long-lasting, durable installation, did you know that there’s another, more flexible and less messy way to get those 18-20mm thick wonders in place and ready to walk on? Well there is, and it comes in the form of Adjustable Support Pedestals…
What are Adjustable Supports Pedestals?
Adjustable Support Pedestals are a system that enables the laying of large format outdoor tiles and paving slabs without the need for grout and adhesive. They are what is known as a ‘suspended system’, meaning that no mechanical fixings are involved and the weight of the tiles or slabs hold everything in place (thus negating the need for permanent fixing with adhesives).
How Do Adjustable Support Pedestals Work?
The pedestals are designed with a telescopic stem which is wound up and down to achieve a completely flat upper paving surface. Changes to height can be made whilst the slab is in place, saving a great deal of time and labour.
What Are The Benefits of Adjustable Support Pedestals?
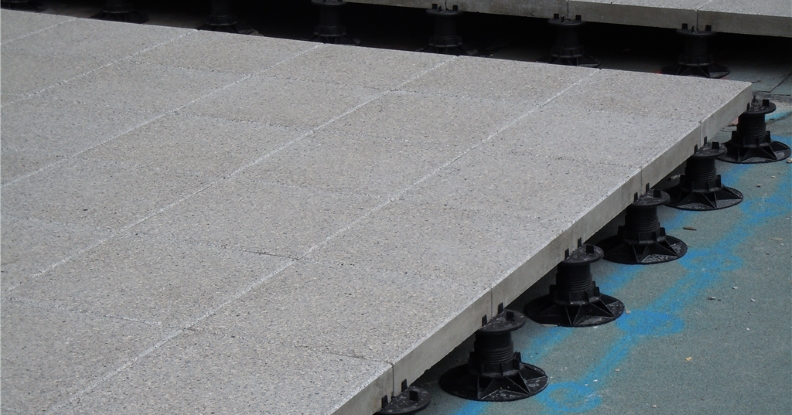
Benefits of using Adjustable Support Pedestals to install large format outdoor tiles include the creation of a void beneath the paved/tiled surface which allows rainwater to run between and under the slabs. This ensures that there is no standing water left on the surface, improving health & safety by making surface less slippery.
In addition, the cavity that is created by the tiles being suspended allows pipes, cabling ducts, and drainage channels to be accommodated and tucked away out of sight. A further advantage of using this suspended system is that tiles and slabs can easily be reconfigured or removed completely as they are not permanently fixed with adhesive and grout.
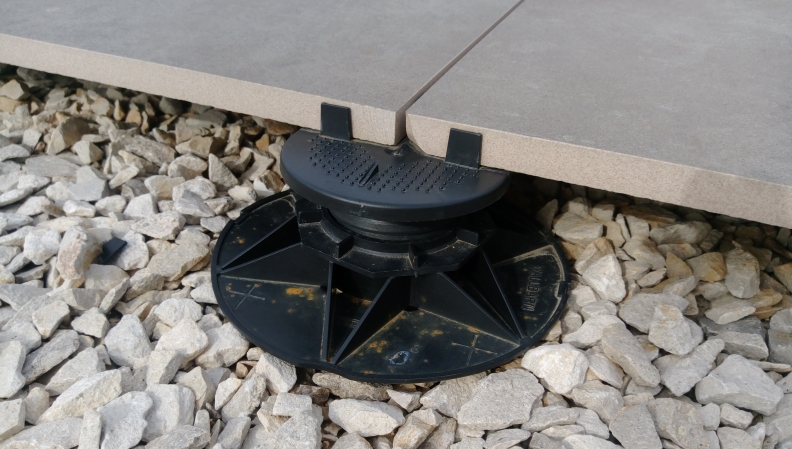
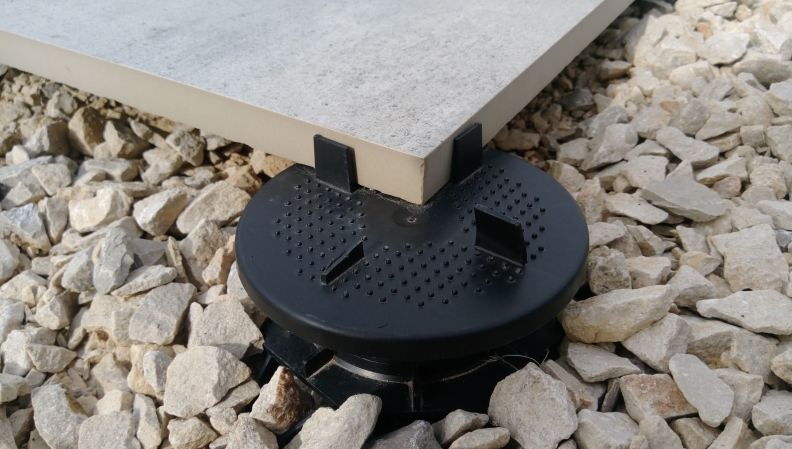
Ideal for roof terraces, patios, and verandas, Adjustable Support Pedestals allow porcelain paving slabs to be fitted up to the threshold level on roof decks or terraces without any risk of flooding. The 2.2mm positioning lugs create a gap between each slab tile which allows rainwater to pass between and beneath them. The lugs also provide a clear paving line, so the slab tiles can be laid in a straight line extremely quickly and easily.
What Are Adjustable Support Pedestals Made From?
Constructed from injection moulded polypropylene, Adjustable Support Pedestals have weight tolerance of 400kg per unit and the strength and consistency have been tested in the laboratory at temperature ranges from +75° Celsius to -40° Celsius. Structural movement is not an issue as the slab tiles are not grouted together, so no cracks will appear.
Before Beginning To Lay Slab Tiles Using Adjustable Support Pedestals
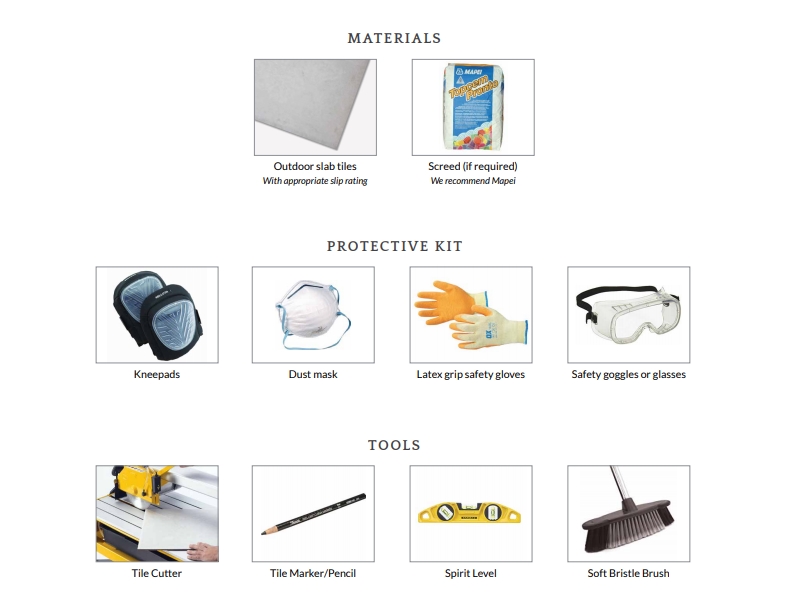
Ahead of starting any tiling project, it’s important to ensure that you have the right tools and materials to complete the job effectively. Below is a list of items that you should have before even beginning to think about installing outdoor tiles using Adjustable Support Pedestals:
Assembling Adjustable Support Pedestal Units
The robust pedestals / supports are manufactured from injection moulded polypropylene and can tolerate loads of 400kg per unit. They are also have a very large tolerance to temperature change and will not crack in freezing temperatures. The baseplates are manufactured with diagonal arms spreading out across the face of them, ensuring that the weight is spread to the maximum possible area and does not concentrate on the core.
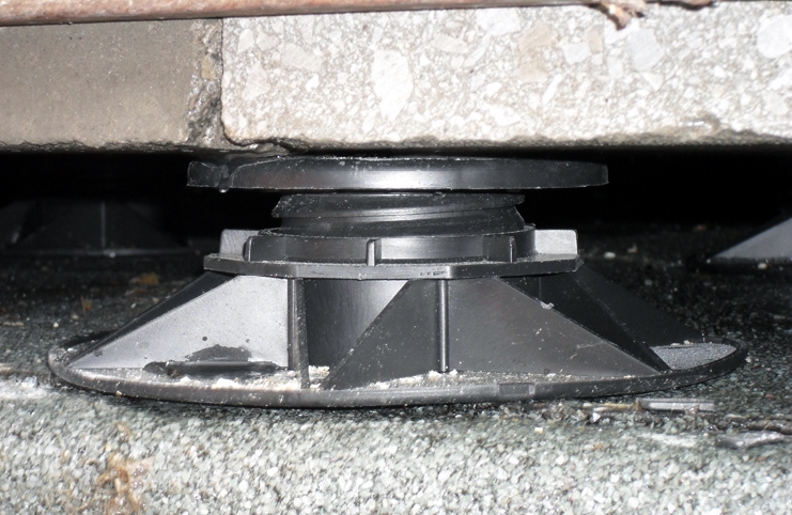
- The large baseplate holds the stem and nut fixing in the central collar. Slot the headpiece into the square indent pressed into the stem (the height of the pedestal is shown on the inside of the indent) to create the pedestal unit.
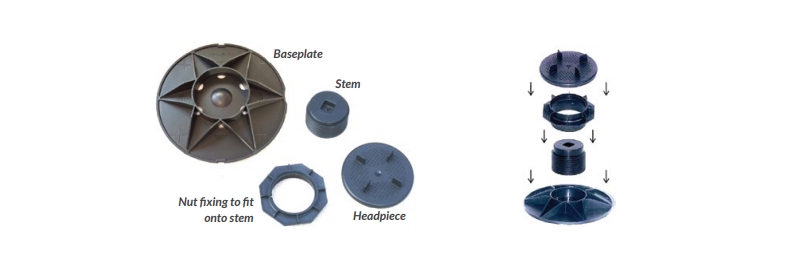
- Place the four complete pedestal units in position and lay the slab tile on top of the head piece. With the slab in-situ, use your fingers to twist the nut fixing on the stem up and down to adjust the height. There is no need to constantly remove and replace the slab.
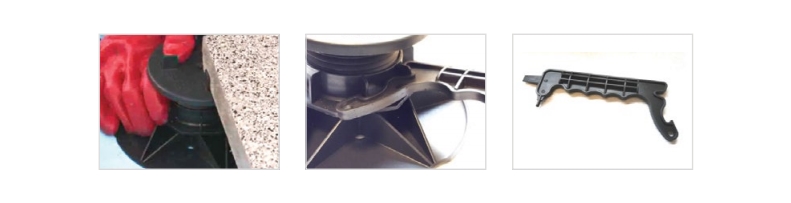
- If height adjustment becomes very tight, installers can use the special tool provided by the ASP manufacturer to help twist the nut fixing on the stem.
Installing Outdoor Slab Tiles Directly Onto A Concrete Base Using Adustable Support Pedestals
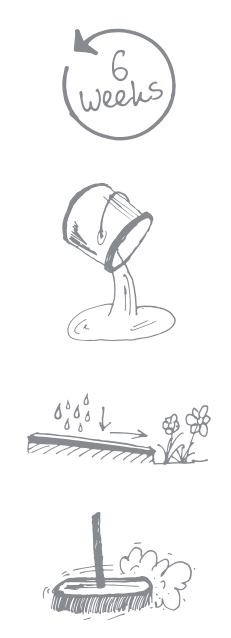
- Ensure that your concrete base has been left to cure for at least 6 weeks before beginning to install tiles.
- Once the concrete base has been installed and left to cure for a minimum of six weeks, Mapei Topcem Pronto can be used to form a screed to allow the creation of falls (a slight gradient that will help standing water to drain away) if required.
- Apply the screed to the concrete base as directed by the manufacturer’s instructions. The screed can be bonded at around 10- 40mm in thickness using Mapei Planicrete.
- If the screed needs to be bonded at a greater depth than 40mm, Mapei Eporip can be used as the bonding material instead.
- Leave the screed to set for at least 24 hours.
- Using a soft bristle brush, remove any dust or construction material remnants from the surface that the Adjustable Support Pedestals will be placed upon.
Positioning Your Large Format Slab Tiles
- Before beginning to set out the Adjustable Support Pedestals, dry lay your slab tiles so as to ensure that you have the correct number of tiles and to work out any cuts that may be required.
- Starting from one edge of the area to be tiled, dry lay a line of slab tiles ensuring that the edge is straight.
- The pedestal headpieces are designed with four positioning lugs set out in a cross formation. Position the corners of four separate slabs onto each headpiece and then ensure they are butted up to the lugs to give a straight, uniform paving line.
- Once laid down, use a spirit level to ensure the consecutive slab tiles form a continuous even surface. The height can be adjusted by twisting the on on the stem of the pedestal unit up and down until the desired height is reached.
- Repeat this process until your surface area is completely covered and the 2.2mm gap forms a straight line between the rows of tiles on all sides.
Paving Up To Edges
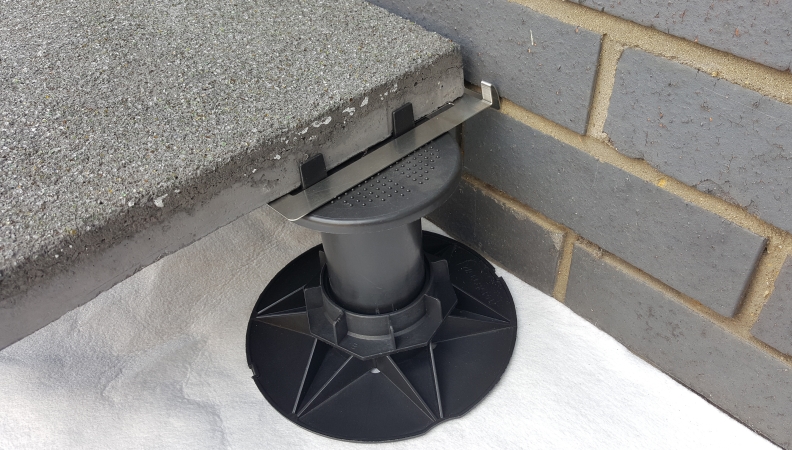
Paving directly up to the wall and around corners is easy thanks to the 150mm diameter baseplate.
Base plates with a smaller diameter are available which means when the area is paved tight up against the wall or parapet the slabs are not left overhanging the headpiece. This means less risk of the slab at the edge moving, providing greater stability.
By either breaking off two of the positioning lugs or purchasing special two lugged headpieces, users can place two edges (rather than four) of the paving slab onto the headpiece and then butt the slabs right up to the wall or edge.
The two slabs up against the wall are sufficiently supported and the weight is still being drawn down through the centre of the baseplate and onto the deck in a consistent manner. This creates a neat finish and adequately supports the slabs.
Trimming Adjustable Support Pedestal Baseplates
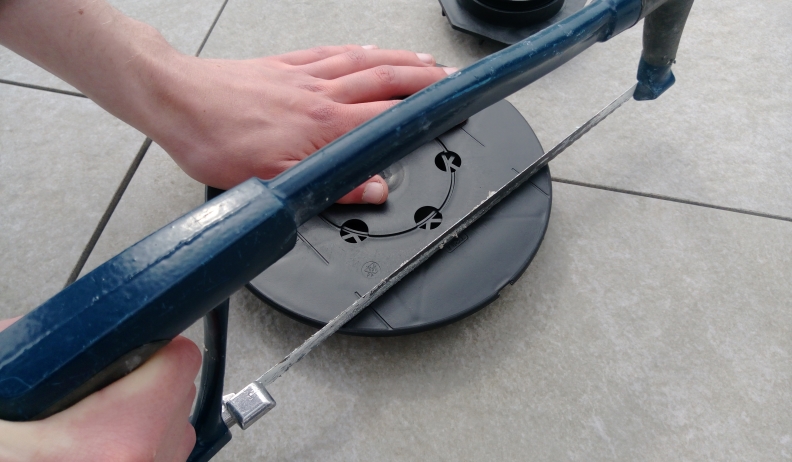
The base plates are manufactured with a series of guidelines, in case users wish to trim them. This may be required when paving up to the wall or around existing pipework or details.
- Locate the lines marked ‘Trim’ on the baseplate.
- Use an electric or handsaw to cut the bases back to the trim line, making the baseplate smaller.
- Please take care not to cut the baseplates any further than the level of the trim line as this will affect the stability of the pedestal.
Hopefully, that little lot will have told you all you need to know about Adjustable Support Pedestals and the benefits they bring. If you’re planning your next exterior project and are thinking about outdoor slab tiles, why not check out our Portico indoor – Outdoor Tiles hub? It’s packed full of useful information about 18-20m thick indoor/outdoor tiles and there’s all kinds of practical and inspirational articles to be accessed from that very page.
If you’ve already got some slab tiles (or even just plain old slabs) and just want to know how to install them using Adjustable Support Pedestals, you can hit the button below to download a handy PDF guide containing all this information.

Be sure to tag us in pictures of your DIY projects over on Instagram, @Tilemountain, we love seeing what you’ve been up to!
Dean heads up the content team here at Tile Mountain, commissioning, editing and sometimes even writing some of the incredibly useful and entertaining content we bring to you on a regular basis. With a background in consumer journalism and a raft of content marketing experience gained from working with huge brands spanning mobile tech and automotive, right through to professional sports and lifestyle sectors, he knows a thing or two about creating content that people love to engage with. Dean also holds the mantle of being our resident grammar pedant, but when he’s not getting angry about dangling participles he spends his spare time going to gigs, watching his beloved Stoke City FC, and adding to his collection of deadstock adidas trainers.