Looking to do a bit of DIY and install your own floor tiles across the home? Don’t worry, we’re here to help! With the help of our resident DIY expert Craig Phillips, we’ll be guiding you on how to install floor tiles, so you don’t have to worry about getting any pricey traders involved!
You will need:
- Tile cutter
- Spacers & packers/ Levelling system
- Spirit level
- Tape measure
- Pens
- Set square
- String line
- Rubber mallet
- Floor tile adhesive
- Large bucket
- Drill & paddle for mixing
- Grout
- Sealant (if applicable)
- PPE
- Serrated edge trowel
- Grout float
- Pen & paper
And your Tiles!
1- Check your door size isn’t going to be a problem
If you’re tiling in a room where the door opens inwards towards the room, you’ll need to ensure there is enough clearance at the bottom of your door, to accommodate for the extra height you’ll be adding when your tiles are installed. If you think your door size may be an issue, lay two of your tiles on top of one another in front of the door, and draw a line across the door where the top one sits. Take your door off its hinges and cut away the section along the bottom of the door that you’ve just marked. Reattach the door, and double check it now clears your floor tiles. If you need further help and advice on how to cut a door down to size, be sure to check out our guide!

2- Plan your layout
You’ll need to plan the layout of your tiles before you get started to ensure you’re happy with the style and format. Grab yourself some gridded paper and a pencil so you can draw out the shape and size of your room. With a tape measure, measure all points across the room and draw these onto your paper, using the grid as a guide for your measurements. Measure your chosen tiles and start to plan out various ways of laying them.

Find the centre point of the wall in your room, and use this as a guide for figuring out which layout will work best for you. Some examples are; laying a tile either side of your centre point, so the grout line will be in the very centre of the wall, and working outwards to each edge of the room. Or, line the centre point of your tile up with the centre point of the room, and tile outwards from here. Decide which will be best for your space, accounting for the cut pieces at each edge of the space. You can also use your diagram to decide whether or not you’d like to do a brick bond layout, planning where each tile is to go on your floor space.

3- Prepare your adhesive
When it’s time to mix your adhesive up, grab your large bucket, adhesive powder and some clean water. Cover your face with your PPE, as the adhesive is a powder product, and pour into your large bucket with water in the bottom. Use a drill and paddle mixer to mix this product. If you’re using a rapid set adhesive like we are, mix roughly enough product to last about 15 minutes of work, as it will begin to dry in this time.

4- Placing your tiles
Following your layout plan, you can now start laying your tiles. Spread some adhesive onto the floor with a trowel, and comb it through with a serrated edge trowel to ensure its an even spread. Work in one tile increments to ensure you have the space and time to move it around if needed. Place your tile down and grab your levelling clips, placing one under each corner of the tile. Now place your second, third, fourth and so on, working outwards until you reach the edge of your room, placing levelling wedges in each one of the clips you’ve installed to level the tiles. Check with a spirit level that your tiles are straight before leaving the adhesive to dry. Leave any cut tiles until later on in your project.

If you’re struggling to use the levelling system, be sure to check out our How to Use a Levelling System When Laying Floor Tiles tutorial.
5- Ensuring your tiles are straight
If you’re working in a larger tiled space, be sure to check that your lines and tiles are straight throughout. You can do this with a string line. Fix the string at one end of the room, in line with your grout line, and run it across the floor space, lining it up with the other grout lines. This will highlight if any of your lines don’t quite match up.
6- Cut your tiles for the edges of your room
When you get to the edge of your room you may have found that you need to cut some of your tiles, in order to make them fit into the gap. To measure how much you need to cut off your tile, lay one tile over the edge tile, lining up with the tile underneath. Grab yourself another full tile and lay on top of the first, pushing it up against the wall to be flush. Mark on your first tile where this sits, this will be where you cut. You can also use a tape measure to measure the gap between the tile you’ve laid and the wall, marking this measurement on a full tile to cut. Use a tile cutter to cut your straight edge tiles, placing it on the floor pushed up against the wall, and score where you previously marked. Use the attachment and a sharp, harsh movement to snap the tile where you previously scored it.

If you’re struggling to grasp this process, check out our handy How to Cut Straight Tiles guide.
7- Cut your tiles to fit around obstructions in the room
If you come to an area on your floor space that has an obstruction, perhaps around the toilet or around the door frame, you’ll need to cut your tile to accommodate this. You can do this by creating a template of the tile you need. Grab a full sized tile and a piece of cardboard, and draw around your tile, then use scissors to cut this out. Measure the areas where your tile is obstructed, and reflect this onto your cardboard tile. Cut around the area with scissors, and place this where your tile should sit, to ensure you have a piece that fits.

Place this over the full sized tile and draw around it, ready to cut. Cut your tile using a four inch grinder with a diamond tip blade, going slowly and carefully. Check the shape and size of your tile in your gap, ensuring you’ve cut enough away. Lay your tiles as you have laid the previous tiles in your space.

8- Remove your levelling system
Once your adhesive has set, grab a pair of plyers and tug on your levelling clips. These should come loose and be easily removed. If these are removed with enough care you’ll be able to keep the levelling wedges to use in your next tiling project, and just purchase new clips.
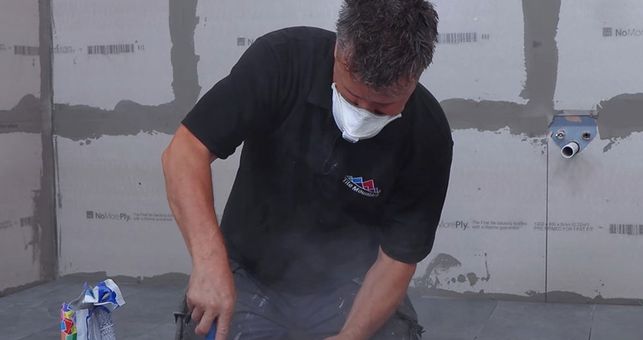
9- Grout and seal your tiles
Once your adhesive has dried, you can now grout and seal your tiles. If you’re unsure if your tiles need sealing or not, be sure to get in contact with our friendly team, as they’ll be able to advise. If you have any dried adhesive across your tiles, use a scraper to remove it before getting started on your grouting.
If your tiles do need sealing, use a brush roller or a brush to apply a layer of sealant across your tiles before you grout them. Once this has dried, you’ll be able to begin grouting. Mix your grout as instructed on the packaging, and use a rubber grout float to spread across your tiles, pressing it into the joints and simultaneously scraping away any extra grout from the surface. Using clean water and a sponge, wipe away any excess grout from across the surface of your tiles. Allow your tiles to dry and clean again, repeating this until your tiles are perfectly clean.

When your tiles are dry and clean, if they need sealing, apply another layer of sealant across the surface. If you need more help with sealing and grouting your tiles check out our guide on How to Grout and Seal Floor Tiles.
There you have our full guide on how to install floor tiles. We hope you found it useful and feel like you can now DIY your space! Be sure to tag us in the results of your space on Instagram, @Tilemountainuk, we love seeing your projects!
How to Cut Straight Tiles
How to Grout and Seal Floor Tiles
How to Cut a Door Down To Size