
If you are in the middle of creating a new look for your home with tiles, you’ll already be aware of the time and attention it requires to get a really great finished product. You simply can’t scrimp on the prep and planning and expect your tiles will look great for years to come. So if you are tiling just a portion of a room or area, then it’s really important to make sure the edges and the corners have a professional finish rather than an exposed tile edge which can be subject to damage and generally just looks unfinished.
To help finish off your job, you’ll want to use tile trims. Coming in a variety of colours and styles, you’ll have a wide choice to match the tiles you’ve chosen and ultimately, the style of your room.

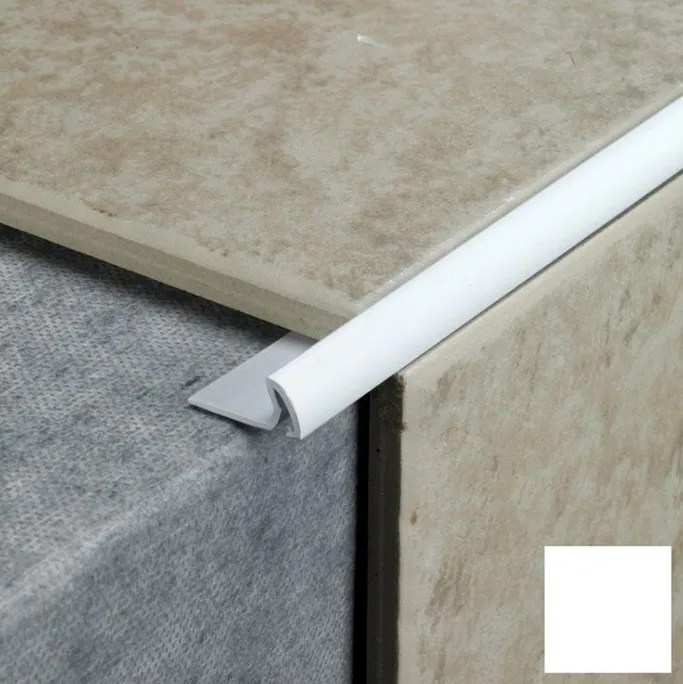
A rounded or bullnose edge will create an additional feature in your wall tiles and in various colours, can either accent by contrasting with your tiles or blend in by matching the tiles you’re installing.
If you are looking for something more sleek and contemporary, then a straight edge in chrome may be just the thing to finish off the look.

If you are looking to connect a three-way join, then edge corners are your best bet. These tile corners, available in plain colours or polished chrome, will create a rounded corner and finish off the job perfectly whilst protecting your tiling.


If you are looking to install trim for your tiles, here’s how to do it:
How to Install Tile Trim
Step 1: Planning
First, decide if you will be installing tile trim to just the base of the wall or the corners as well. When installing trim to floor tiles, you’ll want to ensure to place trim tiles on all your edges or to the edge where the tile meets another flooring material. Always plan the installation of your tile trim alongside your tiles as they need to be installed in conjunction with one another.
Step 2: Measuring
Measure the base and corners to be installed with tile trim to determine how much linear trim you will be needing for your work. Double check this measurement as it’s crucial to get right, especially once you start to cut in the next step!
Step 3: Cutting
Trim should always be cut at 45° angles at wall edges and bases. To cut the trim, use a mitre box and ensure the trim is secured against one of the sides and use clamps to hold the trim firmly in place. Using the channels in the box as a guide, cut the trim with a hacksaw or a trim cutter and repeat for the rest of the trim lengths. Ensure the cut portions fit each other, forming a 90° connection before gluing. If you do not need to mitre the trim, simply cut it at a 90° angle to the length of the trim.
Step 4: Adhering
With chalk, mark the surfaces on the wall where the trim will be installed then line the marked area with strong tile adhesive using a trowel or similar device. To ensure they are set in place, press the tile trims on the adhesive firmly and allow it to dry overnight.
Step 5: Applying Grout
Fill the areas of the trim where there are spaces with grout and allow it to dry. Apply sealer on the surfaces of the grout to further enhance the effectiveness of the grout and allow it sufficient time to dry. Afterwards, you can carry on with the installation of the rest of the tiles.
The installed tile trim will prevent any damage to the edges of the tiles so ensuring a proper installation is vital to completing your tiling project.
Once your trims and tiles are set, you may need to fix accessories like towel rails, shelves, or hooks onto the tiled surface. Learn how to do this safely in our guide on how to drill through tiles.
If you’re planning to give your bathroom a fresh new look, explore our stunning range of bathroom tiles that combine style, practicality, and durability for every design.
In Summary
- Plan the installation of your tile trim alongside the installation of your tiles.
- Measure the areas to be installed with tile trim and then them measure again to be 100% sure.
- Using a hacksaw or trim cutter, cut the trim at a 45° angle at wall edges and bases and ensure that each portion fits together at a 90° angle.
- Mark the surfaces onto which the trim will be installed with chalk before installing.
- Coat the area that will hold the trims with tile adhesive then press the trims firmly into it.
- Leave the adhesive to dry overnight.
- Fill the areas of the trim where there are spaces with grout and allow it to dry.
- Apply sealer on the surfaces of the grout to further enhance its effectiveness.
As a multi-award winning interior design content creator, Kimberly Duran is an Interior Design-obsessed American ex-pat, who chronicles her decorating journey and dispenses interior design advice in her personal blog, Swoon Worthy. When she’s not helplessly drooling over all the latest trends in design, she’s adding things to the imaginary ‘shopping basket’ in her head, she likes to get messy tackling DIY projects with her partner in crime, Wayne, stalking eBay for vintage bargains and filling her home with her favourite neutral – gold.


